


GarretGraves Members
-
Posts
392 -
Joined
-
Last visited
Content Type
Profiles
Forums
8Tracks
Events
Blogs
Posts posted by GarretGraves
-
-
https://soundcloud.com/soleparadigm/tr-strings-demo
How's this sound? I feel the difference in the stitching together.
-
Yeah, in my current orchestral templates, I have an instance of Kontakt for each String group (so 5 total), I have an instance for High Brass and Low Brass each, and so on and so forth.
Yeah this scares me a little cause I'm worried my machine won't be able to take that much at once. Got an Intel i5 processor with 16gigs of RAM and all my drives are 7200rpm. Sounds like an up to date machine but i still freak out when I start loading all kinds of shit.
-
Naw, you don't have to, I was just being lazy.
You can use a Rack Instrument and route multiple MIDI channels to it for each articulation.
PLAY supports 16 articulations in a single instance--more than enough for my example.
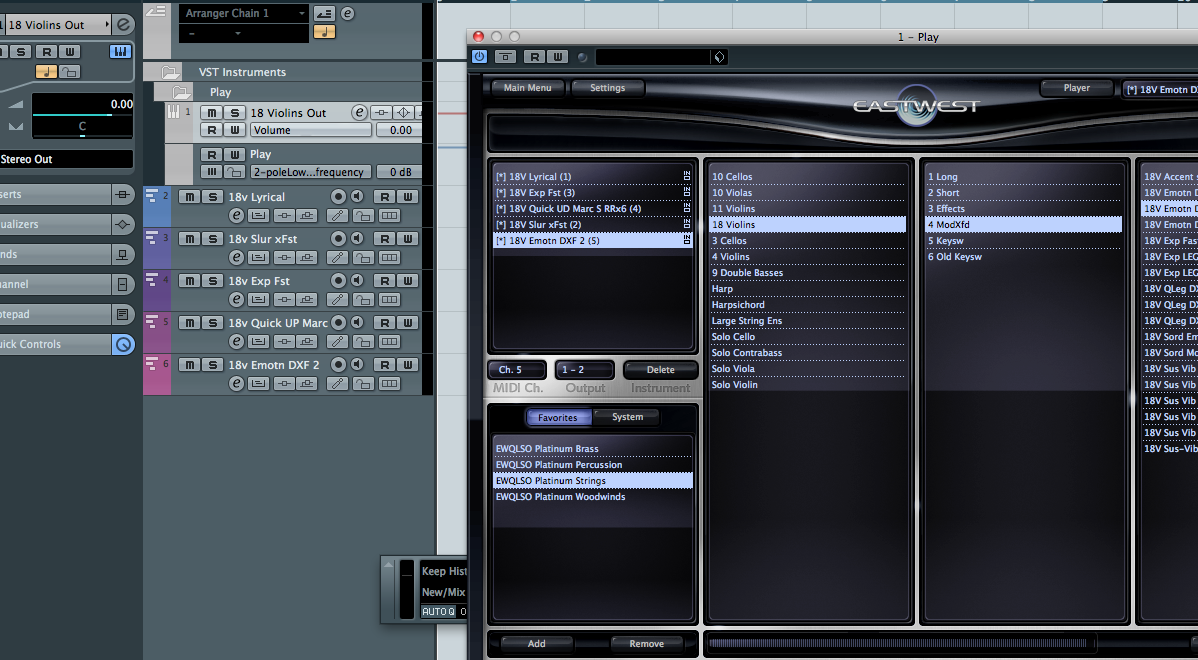
EDIT: I put the same setup together at work, here's a screen shot of PLAY as a Multi-Timbral instrument placed on Cubase's Instrument Rack with 5 MIDI tracks routed to 5 of 16 MIDI channels available in PLAY, with all of the articulations on a different MIDI channel.
I think this is what I'm doing now actually. I got Play set to a port and then a handful of MIDI outs routed in FL Studio for each articulation. That the same thing? Sounds like it.
What I meant was Im gonna need more than one instance of Play because I think I'm gonna need more than 16 channels for the articulations for the other string instruments.
-
Ah! CLICK!
But it was as I feared. I'm gonna need more than one instance of Play to fulfil my needs. Was hoping to avoid that but I guess it was inevitable.
Thanks Dan! And thanks for the honorable mention. haha
-
I understand and appreciate your frustration.
Please understand that while EWQLSO is a brilliantly engineered library (Dennis Sands' preliminary engineering on that prior to noise reduction post processing is brilliant), the library is very old and sampled with a philosophy that layering and stitching together different patches is what is required to get a really believable performance.
This is what we call the Old Skool.
Amazing things have been produced and created in the old skool, but it requires a great deal of effort from the programmer to get it right.
Believe me when I say, my first gig in games was programming a famous composer's Symphonic Choirs composition. It's work, no one wants to do it, but it can be done.
A good solo performance might require as many as 4 or 5 different patches, stitched together in sequence to serve a single performance.
I figured as much and I'm willing to do the work. No question. But I'm surprised that almost no one has posted a tutorial or anything in regards to an in depth look at the library and how to use it. One guy so far as been attempting to make a series of videos to help people out but he's been to busy to make them. Its funny. You'd think someone out there after all this time would have gone and done something like that. I've seen videos for basically everything else like Massive and Absynth and FM8. It would seriously be helpful to laymens like me to learn some as initially complex as this.
Best I can do now is bug forums with questions.
 and attempt things myself of course.
EDIT: Now when you say old, are you telling me there are better libraries out there that simplify the work?
-
My midi controller is busted. I use "edit events" in the piano roll to automate. Little bit harder but it gets the job done. That part I understand and need to toy with. Its just that there's SO MANY samples I don't know what the right one is for what I'm doing. Whatever will make it sound natural.
As for the mixing goes, I'm kind of having a hard time in that area too. I'm listening to some more orchestra music like the 25th anniversary Zelda disc that came with skyward sword. So far all I could match closely is the panning for the strings. (Violins and violas to the left, cellos and basses to the right) But my mix feels a bit cold and somewhat lifeless compared the to disc. Is it possible to match the quality of a real orchestra with EWQLSO? I know it can get awesome. But I've become such an audiophile in recent years that I badly want that level of authenticity out of my gear.
-
https://soundcloud.com/soleparadigm/orchestra-test-1
Sorry for the low-volume mix. Didnt have time to add a limiter or anything.
My mixing is also an issue. I lack a certain warmth you'd expect from an orchestra.
-
First the need answer I need most at the moment:
How to go from legato strings to staccato strings and back in unison using EWQLSO Platinum Plus whilst sounding realistic. Can't seem to do this right. Samples don't connect naturally.
Now the story (Skip if you want. I'm only telling this to show what I've done to solve this so far):
I've recently upgraded my orchestra library to EWQLSO Platinum Plus and got rid of that old Kompakt version I had. The PLAY engine is giving me some nice control over things now. But I'm still having an issue in the realism department. I've looked on the internet for some tutorials on this matter but there were only a few and only 1 of them was only sort of helpful (and somewhat poorly put together I might add.) Just to give you an idea:
This guy gave more of a tour on Cubase 5 than how to use the SO.
This guy did a better job in regards to sustained notes and DXF's but didnt mention what samples he used nor did he mention stacatto at all. 48 minutes of sustained lines?! sheesh
So far that's all I've found as far as tutorials. I've read the manual but it only tells you what the samples are and what they're suppose to do but they don't describe HOW you're suppose to do it. I've been on the forums of East West and tried to get some answers there but since I'm a new member there it takes until the forum moderator approves my posts that people can see them. (Or maybe no one is taking the time to respond
 )
)Which as led me back here. I only mentioned the above to show I've made the effort to learn on my own and you know where I've looked. Does ANYONE know where I can learn how to use this properly or at least teach me how to go from legato strings to staccato strings and back and making it sound natural?
-
I just bought an Axe-FX II a month or so ago and I gotta say it's the best investment I've ever made.
www.fractalaudio.com will show you some super-well-known musicians hailing this baby. Dave Mustain (Megadeth), John Petrucci (Dream Theater/Liquid Tension Experiment), Adrian Belew (King Crimson/Talking Heads/David Bowie), etc. They just updated the firmware and it sounds killer! I'm selling my Line 6 Spider IV amp since I won't be needing it anymore. Of course, if you wanna play with the Axe-FX live, you're gonna need a cab and a power amp. But if you're using it for a home studio (like me) just plug it into the mixer! It also has a software called Axe-Edit (that's FREE!) where you can use your computer to edit your tones and FX without looking at the itty bitty screen on the unit itself.
There's SOOOOO MUCH that you can do with the thing! Like TONE MATCHING! Wanna sound like your favorite guitarist? You can come seriously close to their tone using Tone Matching. More on that here:
Then they have FX like arpeggiator and stuff that open you up to even MORE possibilities. Of course, their website has all that info.
I went looking for a great tube amp at Guitar Center by my house and asked them what they thought of the Axe-FX. The guy said, "Bah! It still sounds digital and it's not worth it. Here! Buy this Egnator amp!" After making my decision in buying the Axe-FX I know now that that young'un ameteur didn't know what the fuck he was talking about. Sure Egnator is a great amp, but I think I came out on top with my choice.
It's down to 2199.99 at Fractal. With shipping it came out to 2236.64 I think. 500 less than what it was. If you can grab it. GRAB IT!
-
This really is an open-ended question. There is no wrong answer.
-
ebuch pretty much said it.
But what I personally use is a limiter to raise the volume of tracks to keep from clipping. Massey's l2007 limiter works great AND it's trial version allows you to use it forever. It just won't save ur settings for it. Which I've been getting away with all year since I found out about it. I will eventually buy it though because the limiter is damn good and deserves compensation. I THINK they make it in VST form im not sure. Slap it on the master track, adjust the ceiling to about just under -1db. Then set the threshold to however loud you need. Check your headroom on your Master meter to see how much you should use.
Also, another thing to keep in mind, (and I always thank Moseph for this) EQ plays HUGE factor in cleaning up your mix. Getting rid of frequencies you don't want and notching ones up that you do want. What I do for my mixes (I'm a prog rock guy) is cut the mud off of virtually ALL of my instruments. If you use a parametric EQ and roll off or cut around 250 or below for, let's say, a guitar. You'll find that it'll clean it up a bit and give more room for the other frequencies above it to flow. That's pretty much the first thing I go for now when mixing is EQ. Then compression or multi-band compression if I need it. (If you have 200 american dollars, Waves.com has their C6 MB Comp that'll do WONDERS!) Getting rid of mud will give you more headroom to work with so you can gain more loudness without sandwiching the shit out of it.
EDIT: I should also mention that all limiters work virtually the same way. They have Threshold, Ceiling and Release knobs on them. So if you find a free VST one, grab it. Some work better than others so shop around and try a few and see the differences and which ones work to your liking.
-
Music that is correctly marketed to its target audience is what sells. If you were unable to get a live drummer for your album, big deal.
Video game soundtracks did and still do use sampled or synth orchestra. People still buy the games and listen to the soundtracks.
That game OSTs. I'll assume it's the same for an album. Coo!
-
I'm not sure I get it.
If there was anything illegal about making an album where the drums are created via drum machine....we may as well just sue every electronic music producer ever.
I figured. But what about it being a good idea? Would it sell?
-
Hypothetical question.
If I were to release an album using a drum machine, could money be made off that? Is it frowned upon? Are there any laws regarding such a thing?
I ask because it's something I've never heard of and I'm currently working on a double-disc album using all that I have in my home studio which includes Superior Drummer and Addictive Drums. As well as EWQLSO and other virtual instruments. I've yet to study music law or the like so was wondering if it were possible.
-
This was my initial reaction, Neblix, until I re-read what his actual issue is. The problem isn't the wav file changing audio, but the fact that it's visually stretching out as the tempo of the track changes. This is actually completely normal behavior if you think about it. For example:
Wav = 5 seconds long
Tempo = 60 bpm (1 beat per second)
So Wav size = 5 beats
Then, if you change the tempo
Wav = still 5 seconds long
Tempo = 30 bpm (1 beat every 2 seconds)
Wav size = 2.5 beats and streches to half the size
If you want to try to stop this, you'd actually need to assign a specific tempo on the WAV file so it timestreches as the tempo changes. HOWEVER, this will have effects on the audio of the wav that you may not want.
SO, technically, you don't have a problem here as long as your audio sounds correct. You do run into problems, however, when trying to work on the track between tempo changes and the system automatically resizes long wav clips, making your audio preview a mess.
There is a workaround I use to deal with this long wav files that progress through tempo changes:
1. Add wav file to track
2. Click so your cursor is on the first tempo setting in the track
3. Now, navigate to just before your first tempo change
4. Using the razor tool, slice the wav file right where the tempo changes (make sure your cursor is still clicked BEFORE the tempo changes so the tempo on the project is correct, this is important)
5. Now, click on the newly created "second" wav portion AFTER the slice where the tempo changes (this will set the project tempo to the new tempo)
6. Navigate to just before the next tempo change and repeat step 4
Basically, what you're doing here is creating "checkpoints" for your long wav files so they will align properly with each tempo section of your track. This will allow you to work on each section with the audio parts properly lined up.
Hopefully this helps. Let me know if you have any questions.
This doesnt seem to work either im afraid. At the first tempo change, the first section of the song resizes itself and overlaps with the second section. Plus the second section doesn't align properly with the metronome after the tempo change. Also, if I try to adjust it so everything lines up, either the first or section section will be sped up or slowed down in playback speed. (Fast forward, slow-mo, you get the idea)
I also tried cutting each section up with the tempo changes and putting each section on it's own track. My idea was to mute the sections i wasn't working on then work with each section individually. But once i navigate to the next tempo change, if I go back to a previous section, the beginning of that section gets cut off. It starts late.
I may be looking at individual sessions for each tempo change.
-
It didn't? That's strange, that should've done it. I would only say this, then: I don't think it's a very smart idea to export something that has been tempo automated, and then tempo automate it again. Maybe try exporting the drums without tempo automating them.
Problem is if I do that then I can't record the guitars and bass properly at the desired tempos. I automate tempo again to be able to quantize the keyboard parts in the proper tempos in each section of the song.
-
Didn't work
-
Ok. I have a habit of being totally oblivious to obvious options in FL. This time I've tried harder to find a solution myself but with no success. SO!
My workflow normally involves sequencing drums in an FL session then exporting them out (piece by piece) in WAVs and importing those WAVs into a Pro Tools session for recording guitars and bass. Once those are recorded and roughly mixed, I export the PT session into a single WAV and import it back into FL to add keyboard parts (piano, synth, orchestra, etc.) I do this cause Pro Tools MIDI is harder to use and FL is easier to look at. As well as other features but those are irrelevant here. I've been doing this for a while and I've yielded excellent results.
Then I learned how to change the tempo of an FL session in multiple places and went ape shit with it. There's at least 6 or 7 instances where the tempo changes drastically. (Those of you familiar with Dream Theater, think "Dance of Eternity") But instead of using 1 tempo clip (envelope) to adjust the tempo throughout the session, I've used multiple clips in various parts of the session with each clip assigned to it's own BPM. Seemed more efficient that way.
For this one song I'm working on, adding keyboard parts has become troublesome. I reopened the FL session with the drums and took the drum channels out and left the tempo clips in their place so I can properly add keyboard parts. I imported the Pro Tools WAV into the FL session and put it on track 1 (by default). Here's where I encounter the problem. When in SONG mode and plays, the WAV file will "stretch" itself out (visually. Speed and pitch of the WAV are normal) to compensate for the tempo changes. This is annoying because I can't add anything anywhere without the WAV file adjusting itself. Is there an option where I can make it not do this?
-
Er, well I guess I'm not really knowledgeable on this stuff, but it's something that I always check before I seek help.
But for what it's worth, here's there website and DL link:
Doesn't like my Mackie.
I tried bouncing the choir patch still and imported it into Pro Tools but I get the same result. Not sure that's it. -
First off, you're running it with ASIO4all right?
Actually I might be using LoudASIO. Came with my mackie 820I
Could that be the problem?
-
I've had this problem for some time now but always managed to find a way around it. But I know that solving the problem will cause less hassle in the long run.
Listen Here: http://soundcloud.com/soleparadigm/choirtest
I'm using Omnisphere's choir patch for a track I'm doing. Long sustained notes being played but then cutting in and out of existence. I've tried different settings and adjusting ports but for some reason when I mix it down into a WAV file i get this result. This has been happening even before I upgraded. (I'm NOT on the latest beta by the way.)
And it's not the sound patch. This happens with pianos, cellos or anything that has sustaining notes. Anyone ever have this problem? I'd greatly appreciate some help on this. Thanks!
-
I kept looking in menu's and crap! I didn't know you can right-click the fricken tempo box. I thought you can only do that on things below in the session. (Playlist. Channels, etc) So yeah, I failed there.
Actually using automation clips where you want the tempo change seems ideal. I had a little trouble trying to use edit events cause it wouldn't stick on one pattern for some reason. I was missing something for sure. But I discovered you can use automation clips to trigger the temp changes where you want them on the track listing. Very handy!
-
You just wanna change the tempo? You know you can automate pretty much anything right?
Either right click on the tempo and select "edit events" or right click and "create automation clip".
The automation clip can be a little fiddly, but edit events works like a charm, especially when you use it on individual patterns.
*face palm* RIGHT CLICK! That's like the ONE things I didnt try. Im a dork. Nevermind. Fml. GG. OMG
-
I use FL Studio 10 for anything MIDI related. I could use Pro Tools 10's MIDI but it is visibly atrocious.
Thing is, the one thing, ONE THING, that I cannot figure out how to do with FL 10 is (if it's even possible for the DAW) to change the TEMPO multiple times within the same session. I always spread out triggers to emulate the slowing down of a beat. But it's techincally at the same tempo but just at a different meter. (Say, from 4/8 to 4/4, etc.)
I havent figured out if it's even possible for FL Studio to do this and I'm wondering if there's something out there that I can use that has this capability. Is there? Price can vary.
From legato to Staccato and back with problems
in Music Composition & Production
Posted
I've done that. But I'm curious as to how low to begin and end. I don't want it too quiet cause this is going over a rock track and if it gets too low it'll sound like it disappears.