


Master Mi Members
-
Posts
471 -
Joined
-
Last visited
-
Days Won
9
Content Type
Profiles
Forums
8Tracks
Articles
Events
Blogs
Everything posted by Master Mi
-
@Xouman At least, it doesn't work the way I'm used to with Google Drive links and direct downloads. You have to go to your Google Drive first and select the uploaded file you want to share with the public. To the far right of the file, you will see an icon with three dots. Click on it to display an option for setting the file sharing parameters. If sharing is still restricted, change the restricted status to a status where anyone who knows the link can download the file.
-
 Learning to play the electric guitar - Part 1: First steps and the first melody I was able to play on the electric guitar after a few hours of practice -------------------------------------------------------------------------------------------------------------------------------------------------------------------------------------------------------------------------------------------------------- In late summer 2024, after a long time, I fulfilled a big wish and finally bought my first electric guitar for my small home studio, a pretty versatile Ibanez Gio GRG140 in a really stylish white. At the time, I didn't have much time to learn how to play the electric guitar more intensively. But at least I was able to familiarize myself a little more closely with the electric guitar, its construction, its functions, its care, etc., and I was able to make the strings of the electric guitar sound quite official and play a few notes using the really good guitar amp plugin Vandal in my DAW Samplitude Pro X4 Suite. Since I had already worked with really good electric guitar VSTis for many years, composing with them and playing them via MIDI keyboard, I already had a good foundation of prior knowledge about electric guitars, guitar amplifiers with their wide range of settings, and various playing techniques on the electric guitar (if only to understand how to implement such playing techniques as convincingly as possible with an electric guitar VSTi based on the playing techniques on real electric guitars). And the melody I play in this video was basically the first melody I was able to play reasonably well after just a few hours of practice. It's a slightly modified melody from the soundtrack “The Price of Freedom” from one of my absolute favorite video games called Crisis Core: Final Fantasy 7, or rather the remake Crisis Core - Final Fantasy 7 Reunion (the short video footage I used here is from the remake version of the game). The original song “The Price of Freedom” was written by Takeharu Ishimoto. So far, I've only been able to play this melody on the high E string. But by using various playing techniques such as hammer-ons, slides, and bends, I've already been able to achieve a smooth-sounding and quite convincing result. Well, I know. When learning to play the electric guitar, playing melodies actually comes relatively late after learning the chords. But I was somehow tempted to provisionally play a few small melodic passages. ... In the summer of 2025, I finally started learning to play the electric guitar with the help of a specialist book, which also included additional online content with illustrative video material for practicing electric guitar playing and actively playing as a solo artist or in a band. I usually only practice a few hours a month. But I feel that even as a complete beginner, I have already made some progress. For example, I have already learned a few important basics, such as theoretical principles relating to electric guitars, the different types of electric guitars, various types of guitar amplifiers, the correct posture for playing electric guitar, and how to read tablature. I've also learned some practical skills, such as tuning the strings, correctly grabbing individual strings in different frets, playing with a pick (which was also used in this video), alternate picking, the basics of playing individual notes rhythmically, and the practical use of a metronome. The first power chords are probably already on the learning plan. Of course, out of curiosity, I have already tried my hand at playing more complex chords, but so far I have failed because I am not yet very good at grabbing the chords correctly, I obviously don't hold my fingers in the optimal position, and I usually end up accidentally muting neighboring strings with my fingers. But I'm definitely not going to let that discourage me, because practice makes perfect (or at least better), as we all know. And my musical journey into the world of electric guitar playing has only just begun. ... However, I was very proud of the live result in this video, even though it took me around 50 takes or recording attempts until the electric guitar playing on my Ibanez Gio GRG140-WH was kinda flawless and the use of various playing techniques finally met my expectations to the extent that I was really satisfied with it. On this new and exciting journey, Master Mi will once again become the inquisitive student Mi and is already looking forward to his potential progress in the coming years and the many interesting opportunities that will arise for the future, especially in the field of music composition for soundtracks and remixes. I could almost say: “Yeah, I'm on fire now.” )) ... But feel free to listen for yourselves. Here's the video with the recording of my early attempts at playing the electric guitar: ... What do you think? Nothing too special - but not too bad for a bloody beginner lvl. 1, eh?
 -
Any advice for getting back in the game?
Master Mi replied to Random Hero's topic in General Discussion
I can literally smell a human sinner here. For this incredibly grave sin, you should regularly repent and synth hard! ... Dude, 15 years? Were you in a creative coma as a musician, snoring away comfortably like a huge Flemish Giant flopped into the cozy meadow, or were you somehow on the run from the Mafia or something? I mean, hey. I'm also kind of a pro at picking up an old remix from over 10 years ago and completely remixing it or rewriting the composition (simply because I've just started getting into music, composition, mixing and mastering around this time). But if you haven't done anything musically in all these years, you've really let yourself go and metaphorically left your passion in your bum bag. ... Nevertheless, welcome back to the club. )) -
@Zacktorial I remember modding my Super NES Mini Classic with extensions such as RetroArch a long time ago. It was quite a fiddly job, but I managed to get a lot of old games running with it. Some of them didn't run quite smoothly, though, which was probably due to the limitations of the hardware or the native emulators on the Super NES Mini Classic. On my PC, on the other hand, all retro games have run smoothly so far with emulators such as Nestopia or ZNES. But thanks for pointing that out anyway. ))
-
Deep-sampled high-quality VST instruments from 8Dio
Master Mi replied to Master Mi's topic in Music Composition & Production
Awesome brass and wind instruments from 8Dio ------------------------------------------------------------------------------------- I was recently browsing the 8Dio website and discovered that they also produce extremely high-quality VST instruments in other areas, some of which even outshine Native Instruments' top-of-the-line VSTis – and at very affordable prices. Take a look and listen to this powerful-sounding tenor saxophone here - it'll really get you in the mood: Among other things, it is available as a small collection called Studio Sax Trio, which includes two tenor saxophones and one baritone saxophone with over 5000 sample at least for the first saxophones, requires a total of 7 GB of hard drive space (for all three instruments), and costs just 49 bucks for the collection at full price for this high sample quality: https://8dio.com/products/studio-saxophones-for-kontakt-vst-au-aax?variant=41310025941192 For such awesome VST instruments, it's definitely worth purchasing a full version of Kontakt as the required sampler. I already have a few really good saxophones and other brass instruments in my Independence Pro Suite collection, which generally sound like this (see the two accompanying audio samples, which you can play using the play button): https://producerplanet.com/us/article/saxophone-brass-2987/ And that's why I won't be buying any more VSTis that I already have in good sample quality. But in the long run, I might buy more of these these truly captivating, extensively sampled VST instruments from 8Dio. This really seems to be the next generation of VSTis, where, with the right handling, you won't be able to tell the difference between sampled instruments and real instruments. ... The trumpets are also mighty stuff: - 26 GB (???) for the new 2.0 version - just for this trumpet (guess that's why I'm going for a 4 TB SSD) - at least 11200 samples - just for the old version (new version might have even more samples) - around 30 different articulations (!!!) - for just 28 bucks https://8dio.com/products/the-new-century-solo-brass-trumpet?variant=41310103077064 ... Since I already have some pretty good brass VSTis, I'm more interested in something I don't really have yet - for example, a whistler VSTi like this one called ‘Misfit Whistling’: - just around 1 GB - over 1500 samples - at least 5 different articulations - for just 8 dollars, considering that it's probably one of the most realistic whistling VSTis around (many other whistling VSTi cost way more and are way less realistic) https://8dio.com/products/misfit-whistling-vst-au-aax?variant=41309892542664 The only really good whistling VSTi that I once had, or possibly still have somewhere, was one from VSL (Vienna Symphonic Library): https://www.youtube.com/watch?v=m_QkAGVNXrs However, that sounded far too professional for my taste. I was looking for a more casual whistling sound, something that sounded more like an ordinary person whistling a melody or something. In addition, despite the high-quality sampled instruments, I found it really annoying that you had to keep a USB key plugged into your computer to use the VSL VSTis. That may sound nitpicky, but for me it was a real deal breaker in terms of continuing to use VSL. I want to have all the VSTi content directly on my computer without any compromises or additional restrictions, without having to deal with any annoying procedures involving USB sticks and such. ... As far as 8Dio is concerned, it seems that you can find a lot of high-quality and sometimes really rare VSTis there (and they seem to have really taken off in recent years - I guess there's a lot more content to come). As for me, I'll probably start by getting the really awesome Studio Steel Drums, the Misfits Harmonica and Misfits Whistling once my SSD hard drive finally arrives, Windows 10 Pro and all the programmes are installed and set up, and I finally bought Kontakt 8. )) -
@Zacktorial Thank's for the tip with Proton. This seems to be almost the best solution for using Windows programmes (perhaps even a Windows-exclusive DAW) on Linux systems. With Winboat, I was a little surprised in the beta versions that this Windows emulation software takes up about half of the available CPU cores (or at least it is recommended). And yes, it's really difficult to assess how tamed or open to the outside world the emulated Windows is unless you're a top-level programmer and know the program codes of Windows and Winboat. @Argle Yeah, unfortunately that was one of my biggest fears, that all the high-quality VSTis, for which you often have to pay a lot of money, would suddenly no longer work under Linux, or would only work with errors or not properly. Linux seems to have developed considerably over the last 5 to 10 years - not only in terms of greatly increased user-friendliness (so that even radical non-nerds should be able to find their way around relatively quickly), but also in terms of compatibility with various programmes. Nevertheless, Windows 10 still seems to be the best option for DAW users if you want to enjoy a wide variety of programmes and the ability to purchase and use a wide range of high-quality VSTis and plugins, while still having a relatively stable, powerful and potentially long-lasting and secure operating system. So for now, with an eye to the distant future, I guess it's up to us to transform Windows 10 Pro into a stable, nearly impenetrable fortress like Outer Heaven: ... I would certainly have continued with Windows 7 Pro for quite some time (simply because it still runs really well, smoothly and stably). But with Windows 10 Pro, I can also purchase the last VSTis I've been dreaming of and which I really wanted to have in my collection. @Unknown Pseudoartist I recently installed an older 32-bit Linux Mint version called ‘Faye’ on my old Samsung notebook (a really old thing from 2009 – I think it only had a 2-core processor system with 32-bit architecture and, to top it all off, that awful Windows Vista Home Premium operating system). The installation of the OS and the subsequent updates went relatively quickly – much faster than with a common Windows installation. Even browsers like Firefox and Office programmes were included right from the start. In terms of pure speed when working within the operating system or loading pages on the internet, I didn't notice any major differences between Windows Vista and Linux Mint in the respective 32-bit versions. Both ran relatively slowly and sluggishly. However, this may have been due to the old computer itself or the fact that around 40 faulty sectors were subsequently found on the hard drive (unfortunately, I was unable to format the hard drive beforehand, but only overwrote the OS by reinstalling it). But as a Linux emergency notebook, where at least the internet works and you can get to grips with the basic functions of Linux, it's not bad at all. ... Perhaps in the future, I'll get one of those modern, space-saving and kinda affordable mini PCs for playing PC games and emulated retro titles for NES, Super NES and the like on my larger screen in my gaming and movie corner, and then maybe install a modern 64-bit version of Linux Mint as the operating system. Steam shouldn't be a problem with Linux - according to what the guys here said. And I guess legendary emulators like Nestopia or ZNES should be available for Linux as well. ... A big thank you to all of you for your comprehensive feedback. )) Please keep me and the community up to date when there are the first groundbreaking developments for Linux in terms of compatibility with Windows-exclusive DAWs and VSTis, or when other major DAW developers offer their software natively for Linux.
-
Does This Sound Correct?
Master Mi replied to Uffe von Lauterbach's topic in Post Your Original Music!
@Uffe von Lauterbach No problem. There are said to have been people who once tried to create soundscapes with dodecaphonic music. ;) But maybe let's approach it according to the rules of conventional harmony. You wrote that the piece is in E flat minor. This means that the following notes occur: Eb, F, Gb, Ab, Bb, Cb (B), Db. An Emaj13 chord contains the following 7 notes: E, G# (Ab), B, D# (Eb), F# (Gb), A, C# (Db). This means that only 5 of these 7 notes in the chord are part of the scale. And that obviously creates this brief dissonant interlude in the soundtrack. So you can either change the chord or the key to make this little passage sound more harmonious, although I would definitely modify the chord to match the key. I created an audio sample with 4 little piano chords for ya (everything arranged from the lower to the higher notes). Chord 1 >>> your Emaj13 chord that doesn't really fit your chosen scale (just for comparison) >>> notes: E, G# (Ab), H, D# (Eb), F# (Gb), A, C# (Db) Chord 2 >>> a highly depressing chord (but fitting your scale) >>> notes: Eb, Gb, Bb, Db, F, Ab, B Chord 3 >>> a little bit less depressing chord with a tiny spark of hope (fitting your scale) >>> notes: Eb, Gb, Bb, Db, F, Ab, Db+1 (1 octave higher than the previous D) Chord 4 >>> a rather inviting chord with a slightly eerie undertone of impending death (fitting your scale) >>> notes: F, Ab, B, Eb, Gb, Bb, D# It sounds like this: Piano Chords.mp3 Perhaps you should check whether one of these three chords would be more suitable for the critical part of your track. ... Have fun and good luck with your composing. )) -
Thanks for sharing your experiences. )) Since the delivery of my SSD hard drive for the planned Windows 10 Pro installation has been postponed by almost a month, I think I'll at least install and test Linux on my old notebook to find out how it works in detail, how well, fast and safe it runs compared to a Windows version, and what DAW-related possibilities it offers. I've already flashed the latest version of Linux Mint onto a USB stick so that I can install it on my older notebook later. Another interesting development in the Linux universe seems to be Winboat, which allows modern software developed for Windows to run smoothly on Linux: https://www.winboat.app/ The version is currently still in the beta development phase, but is already said to be working not too bad: Let's see what the near future will bring for developments like these. ... And once software developers realize that more and more people - perhaps 10 to 20% of operating system users - are switching to Linux (which is already a significant number), it is very likely that more and more programs and well-known software will be developed as alternatives or even natively for Linux. And then we can only hope that Linux, with its increasing market power, does not follow a similar path to Microsoft, for example by allowing large companies to overshadow, take over, displace, or even buy up the open-source software sector within Linux distributions.
-
I wanted to ask everyone how you plan to handle your DAW in the future. Microsoft, with its “too big to fail” mentality, seems to be becoming increasingly bold with each new Windows version, and you sometimes get the feeling that Microsoft is more and more becoming the owner of your PC, while you yourself are increasingly being relegated to the role of a fool who, in a world of increasingly powerful and opaque corporate structures, is simply allowed to agree to become an increasingly transparent citizen. Windows 11 in particular seems to be taking things to extremes, while powerful computers that may only be a few years too old are being dismissed as obsolete and, in true capitalist fashion, according to Microsoft's rules, should be scrapped today in order to buy a completely new computer with an uncertain expiration date. This is what it looks like when unelected, filthy rich billionaires with their money-is-no-object aura decide to play world politics. I'm getting increasingly fed up with how Microsoft handles our data, personal rights, and finances, and how it is developing an increasingly resource-hungry version of Windows that seems to be turning into a dysfunctional data octopus full of changes for the worse, and which is becoming less and less capable of fulfilling its function as a stable, powerful and long-lasting operating system for user applications. I'm currently still living in the happy Windows 7 Pro era with an eye on Windows 10 Pro (which most of you probably have at the moment), just for being able to get some newer VSTis. But I'm increasingly considering switching to a Linux version such as Linux Mint, as the increasing user-friendliness of Linux means that more and more musicians and DAW users are switching to this system, or at least, with Windows "The Eye of Sauron" 11 looming in the near future, more and more people are toying with the idea of cutting ties with Microsoft after Windows 10: So I would like to ask the DAW users among you in particular how you plan to handle this in the future. Are any of you already using Linux for music production - or has anyone even managed to get their DAW or DAWs (including additional VSTis and plug-ins), which were developed exclusively for Windows, to run completely on a modern version of Linux?
-
Deep-sampled high-quality VST instruments from 8Dio
Master Mi replied to Master Mi's topic in Music Composition & Production
Yo, ho, ho... Sounds like music in my ears. :D But thank you - I'm not really keen on all the Windows security updates. I'm just coming out of the Windows 7 Pro era (and I still get occasional updates for Windows Defender). I only really need Windows 10 Pro 64-bit so that I can implement newer VSTis into my DAW and be completely satisfied for the next 10 years without having to buy a completely new computer again. I often use additional software for system security. ... Windows 10 Pro 64 recently arrived at my home. Now I'm basically just waiting for the 4 TB SATA SSD I ordered, which I will then install in my current computer and connect in place of the current 2 TB HDD (which will remain with Windows 7 Pro as an unconnected backup system without external access for possible emergencies) so that I can then install Windows 10 Pro 64-bit on the new SSD. And then I'm basically just waiting for a nice Black Friday deal on the full version of Kontakt 8 so I can finally get it along with the steel drums VSTi and harmonica VSTi from 8Dio. At least, that's the plan, which hopefully won't be thwarted by any unforeseen circumstances. ... However, if many more DAW and VSTi developers move towards Linux as an alternative operating system in the future, I might give up on Windows and Microsoft completely, because for me they symbolize rampant capitalism, data collection mania, control freakery, and a mindless throwaway society dominated by greed rather than true technological and social progress. -
A new Dissidia Final Fantasy game on the horizon?
Master Mi replied to Master Mi's topic in General Discussion
Yeah, the really good soundtracks in Dissidia alone would be reason enough to buy it. And as far as I remember, you could also use or unlock a kind of jukebox in the game, as well as additional music tracks. But basically, the soundtrack is just the icing on the cake of the game, which is partly a modern beat 'em up with interactive, destructible arenas and partly a very complex, extensive RPG with an atmospheric story - in other words, a really successful combination of game genres. ... Here you can get a tiny glimpse of how music, gameplay, and story come together in the second Dissidia game, Dissidia 012 Final Fantasy, for the PSP: https://www.youtube.com/watch?v=BKtTPeUk0yA And that's just the beginning of the game, which can offer over 500 hours of gameplay until you've unlocked all story parts, game modes, characters, music tracks, equipment, summons, items, and other secrets. ... Given the huge potential of this game, which is far superior even to the legendary Super Smash Bros. series, I'm already expecting a really big next-gen title for the Dissidia series, even if it's just a remake of the first two PSP games for now. -
Deep-sampled high-quality VST instruments from 8Dio
Master Mi replied to Master Mi's topic in Music Composition & Production
Yes, there are some really extensively sampled VST instruments that you can't tell apart from their original instrument models. And some of them, such as the 8Dio Steel Drums or the Misfit Harmonica, are also incredibly cheap, although the developers may be able to offer the VSTis at lower prices because they obviously develop their VSTis exclusively for the full version of Kontakt (which is probably why the VSTis in the free Kontakt Player “only” run in demo mode) and therefore don't have to pay any additional fees to Native Instruments. I guess that you already have a full version of Kontakt that isn't too old. ... I, on the other hand, really have to figure out how to achieve my desired goal. Because I'm actually reluctant to upgrade my still reliable and fast system with a really powerful computer running the still excellent Windows 7 Pro 64-bit operating system (especially since I dread having to reinstall all the DAW-related stuff, third-party VSTis, and other programs - because there was always a lot to keep in mind, which I probably should have made a note of at the time). And I didn't want to upgrade to Windows 11 Pro yet, because I would probably have to upgrade a few rather expensive hardware components and then probably have to get one of those giant PC cases that wouldn't even fit in the PC niche of my desk, and I would have to buy a new desk and build a new desk attachment for the monitor, studio monitor speakers, audio interface, and headphone amplifier - it would be a never-ending chain of events if I went down that route. I really racked my brains over this, but in the end I came up with a reasonably satisfactory solution to gain access to more up-to-date VSTis by taking the following steps: 1) Purchase of a 4 TB SSD (currently 2 TB HDD) or a 4 TB (or larger) HDD ------------------------------------------------------------------------------------------------------------------------------- Does anyone have extensive experience with how reliably SSDs work on newer Windows systems? I once read that Windows 11 or certain Windows updates have occasionally caused SSDs from certain manufacturers to crash or the SSDs were even destroyed. 2) Purchase of Windows 10 Pro 64-bit ------------------------------------------------------------------- The system will then be considered “insecure” for the next few years. But hey, I'm just coming out of the Windows 7 era and, apart from reliable external security programs, I would at least have the option of purchasing the latest VSTis if I like one (including the full version of Kontakt 8). No more annoying Windows updates (as I was already used to with the late Windows 7) and, in theory, Windows 10 Pro 64-bit should be able to utilize hardware resources such as my 32 GB DDR4 RAM even more efficiently than my good ol' Windows 7 Pro 64-bit. 3) Purchase of Kontakt 8 ------------------------------------------- ... so that I can finally make full use of excellent VSTis such as those from 8Dio. Maybe I should take advantage of any Black Friday special deals in November before the next version of Kontakt is released, which may only support Windows 11. ... But overall, the investment will definitely cost another 700 to 800 euros if I consider the 4 TB SSD version. Music production can be a really expensive hobby if you want to keep up with the times (I hope I won't have to worry about annoying hardware upgrades for the next 10 years). But that's still cheaper and much more enjoyable than having a maintenance-intensive piece of car in the city. If you have any other good tips, please let me know. )) -
These VST instruments might be some of the most extensively sampled instruments I've ever experienced: https://8dio.com/ 8Dio - with its free instrument technology called "Soundpaint" - also provides some completely free VSTis as full version, such as a 1928 Vintage Grand Steinway (around 8 GB and over 4800 samples) or an old music box (nearly 2 GB and over 260 samples): https://soundpaint.com/collections/free-instruments I would describe the the VSTis from 8Dio with the following words: - extremely high sample quality (also many GB of content with lots of articulations and samples per instrument) - some highly affordable VSTis (check out the 2 VSTis below) - lots of VSTis that still work with earlier Kontakt versions (like Kontakt 5) supported by Windows 7 (damn, I just saw that it seems to support only the full version of Kontakt - guess that was the reason why I didn't go for it earlier) ... I recently came across 8Dio again because I've been really keen on a steel drum VSTi for quite some time now, and I'd like to briefly introduce it here along with another VSTi. 1) 8Dio - Studio Steel Drums -------------------------------------------------- These are really high-quality sounding steel drums (probably the most elaborately sampled ones I've ever found in VSTis) for more exotic music: https://8dio.com/products/steel-drum-for-kontakt-vst-au-aax-samples?variant=41309986717896 It's a whopping 12 GB of content, but it's extremely high-quality with over 55,000 samples (lots of different velocities and playing techniques possible) for particularly realistic playing. The VSTi sounds something like this: Really might sound, huh? And all that for just $17, which would be extremely cheap even without the price reduction from $28. It's perfect for exotic Caribbean sounds, which would not only be great for future Star Tropics remixes, but which I had always wanted to use for my own composition “Paradise,” which I had already started working on. As a reminder, this is what the first short version of the composition sounded like a good seven years ago: And I really wanted to turn it into a truly dreamlike, feel-good holiday and relaxation composition, not only to make a name for myself as a remixer, but also as a composer in my own right in the near future, and to be able to present at least one major composition of my own. 2) 8Dio - Misfits Harmonica ------------------------------------------------ This is a similarly high-quality sampled harmonica, a VST instrument that I don't yet have in my VSTi collection and which apparently enables all conceivable playing techniques of a real harmonica: https://8dio.com/products/misfit-harmonica-vst-au-aax?variant=41309893918920 The VSTi has just under 2 GB, over 8000 samples with all possible playing techniques and a pretty convincing, realistic sound: When it comes to music genres, a harmonica may be somewhat limited (it's usually only suitable for certain soundtracks, such as Western music or perhaps ambient music), but for a reduced price of $11 (originally $18), you really can't go wrong. Unfortunately, it's a shame that the VSTis are apparently only fully compatible with the full version of Kontakt, and you can't buy Kontakt 5 anymore to use it with Windows 7. I guess I'll have to get a new operating system in the future (and with it, new computer hardware for Windows 11 and the like), which really annoys me and, especially with Windows, is always a bit of a journey into the unknown. Or I could just use the VSTis in demo mode with a time limit of 15 minutes (Is that the maximum project length for any number of music projects, or will the VSTi stop producing sound in new music projects once the 15 minutes of total usage time have elapsed - and can the VSTi be used to its full extent in Kontakt Player?). ... What do you think of 8Dio's VSTis? And what is your experience with VSTis that only run in demo mode in the free Kontakt Player? Is it worth it if you want to compose properly?
-
A new Dissidia Final Fantasy game on the horizon?
Master Mi replied to Master Mi's topic in General Discussion
A new Dissidia Final Fantasy game has been officially confirmed and announced with a trailer ----------------------------------------------------------------------------------------------------------------------------------------------------------------- A new Dissidia game was recently announced. Unfortunately, it's only a mobile game - but at least it's interesting that Square Enix hasn't completely abandoned such a promising series as Dissidia. So maybe we can still hope for a really good next-gen title for the Dissidia series at some point, which might continue at the high level of the first or second Dissidia for PSP in enthanced audiovisual PS5 or PS6 standards someday. The title is called “Dissidia Duellum” and is apparently even set in the Japanese metropolis of Tokyo: And for a mobile game, it seems to be quite well staged. What's particularly interesting here is that, apart from the usual protagonists, villains, and summoned monsters, you can apparently also fight ordinary enemies from the Final Fantasy universe. I could imagine that the game developers at Square Enix are using this concept in this mobile game as a test phase so that they can exploit, expand, and implement it more intensively in a larger next-gen sequel in the Dissidia series. -
What are you listening to?
Master Mi replied to PassivePretentiousness's topic in General Discussion
I recently listened to a really beautiful remix of the NES game The Guardian Legend: I think I've seen one of the remixers, Souperion, here on OC Remix somewhere before. -
Sonic the Hedgehog - Green Hill Zone Cover
Master Mi replied to S A U C E F O N D A's topic in Post Your Game ReMixes!
Take your time, dude (I personally wouldn't redo the whole soundtrack because it already sounds like a really good approach - rather fix the bigger "problems" and then extend 'n' expand the core version with some unique composition elements and passages). But no matter what you do, I'm lookin' forward to the results someday. )) -
Does This Sound Correct?
Master Mi replied to Uffe von Lauterbach's topic in Post Your Original Music!
At first, the composition sounds really interesting - it reminds me somehow of atmospheric NES game soundtracks from video games like Shadowgate in a more modern version. )) When listening less intently, nothing stands out negatively, either rhythmically or tonally. When listening very intently, I noticed a passage that sounds slightly strange, namely the transition from minute 0:29 to 0:30 (actually almost exactly at minute 0:30). There seems to be a dissonant note in the chord that either doesn't belong to the key or where the notes within the key form a less harmonious chord that doesn't seem to be the best choice at this point, or the notes in the chord are even neighboring notes in the key (and therefore clash tonally with each other). Just try increasing the interval in the chord a little according to the key, or perhaps try octavating the disturbing note. -
Sonic the Hedgehog - Green Hill Zone Cover
Master Mi replied to S A U C E F O N D A's topic in Post Your Game ReMixes!
The somewhat monotonous sound of the strings will hardly be noticeable to ordinary listeners. The creative expansion of the remix composition is particularly relevant if you want to submit the remix to the jury at OC Remix for evaluation. But the really disturbing thing about the remix, the thing that really grates on the ear, is currently the stiff, undynamic, and artificial-sounding piano intro. Even for a piano-like synth, it really doesn't sound good, and you would hardly play it in this machine-gun-like way. Play it rhythmically in the form of smaller waves with different, more harmonious-sounding note lengths and shorter pauses in between - so not so much like “bam dam bam dam bam dam bam dam,” but perhaps more like “ba-da-ram bamm... ba-da damm... ... ba-da ram ba-damm.” ... Use different velocities of the piano VSTi by adjusting the MIDI velocity dynamics settings, as this sounds more lively and varied than if a piano key is played continuously with the same volume and timbre. And it's best to stay away from the quantization function, especially since it can cause individual notes to be quantized incorrectly or far from the actual intention. If some notes played on a MIDI keyboard are not quite in time with the rhythm, it's better to move them individually in the MIDI editor as needed if they stand out negatively in terms of timing. When I use the quantization function in my DAW, it's really only when I'm using a MIDI file as the basis for a remix, in order to “de-quantize” the beat-perfect notes in the MIDI file with a randomization feature in the quantization function to loosen them up and make them sound more human and natural, because the notes then deviate slightly from the beat. In my DAW, I also have a similar feature for randomizing MIDI velocity dynamics, so that I can make everything sound more dynamic, lively, and varied in advance, before I actually start composing and developing the remix piece by piece. … Take a look, for example, at (the final part of) the piano intro I wrote for my Crisis Core remix, which I recorded on a MIDI keyboard and then edited in places using the MIDI editor: There you can see just a few notes that fall exactly on the downbeat of the bar. The timing is pretty good - but not perfect. The note lengths and rests also vary in a way that I absolutely wanted to play this piece. Sometimes the playing style is a little faster in certain places, and then a little slower again, sometimes a little harder and louder, then a little softer and quieter again - like successive waves of varying strength and intensity. And so you can hear how it sounds, here's a link to the audio source: ... I also spontaneously wrote a little alternative piano intro for your soundtrack, based on how I imagine it could sound much better, so that it doesn't sound so synth-like and it might sound a little more natural for piano playing: Sonic The Hedgehog - Green Hill Zone - Piano Intro Idea.mp3 Of course, in that case, you would have to adjust the synth bass and drums accordingly to the alternative playing style. But it could sound quite reasonable if the actual part of the song starts immediately after the final broken piano chord is played. Instead of a fast introductory piano melody, it would also be conceivable to use, for example, 4 increasingly powerful chord sequences as a piano intro. But feel free to try out different approaches that suit your taste and style. ))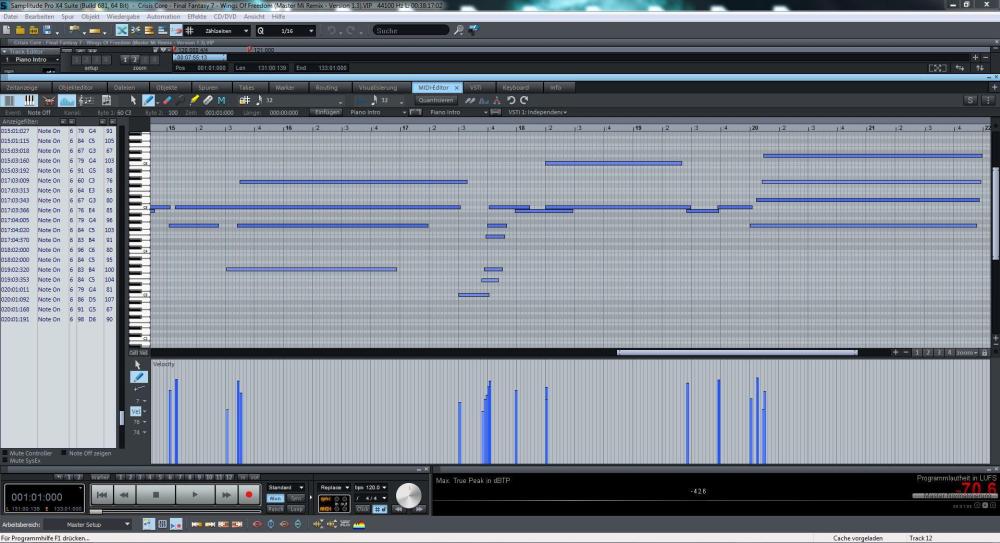
-
I only recently started playing the electric guitar more intensively and currently only practice a few hours a month. But I already feel that I am making slight progress, becoming more confident in grabbing and strumming the strings, and, at least on the high E string, I can play my first melodies reasonably confidently after some practice and by using specific techniques such as hammer-ons, pull-offs, slides, and bends. I still find it most difficult to play chords with at least three fretted strings, and I have particular problems with the alignment or optimal angle of my hand and fingers because I usually end up accidentally muting some strings. ... After about 50 attempts at recording these days, I finally managed to get a really good take where, according to my beginner's expectations, everything really worked out. I'll definitely upload something soon and share it in my Ibanez electric guitar thread here on OC Remix. ))
-
Sonic the Hedgehog - Green Hill Zone Cover
Master Mi replied to S A U C E F O N D A's topic in Post Your Game ReMixes!
The overall soundscape is really beautiful, except some few things I would change: 1) The little piano intro sounds like a pretty stiff 'n' static lead-in, especially concerning rhythm and tonality. Maybe compose a different piano intro with some nice chords, vary the rhythm, let it breathe a bit and change MIDI velocity that it will sound more natural - or use a fitting synth instead (but the piano can fit really well for the little intro if you make some nice changes). 2) Strings sound kinda solid most of the time, but especially the repeating part from 0:40 to 0:52 could need much more dynamics and bit compositional variety to sound less annoying. 3) Work a little more on compositional variety, feel free to incorporate a little break, and for compositional enhancement and elevation, feel free to fall back on the cool lead sound from the original for a certain period of time. But apart from that, pretty cool 'n' fresh approach. )) -
Awesome guitar cover - didn't know that there were other cool themes in the game besides Gambit's Theme. )) The humbucker configuration for the rich, thick lead sound of the electric guitar fits really well into this soundtrack, like a fat lead synth. Pretty nice guitar skills. I just started learning to play electric guitar recently (Ibanez Gio GRG-140-WH with 1 humbucker and 2 single coils), largely under the guidance of a reference book, but also by using my own methods (for example, by learning and playing a fairly uniform scale system that takes the individual octaves into account and allows you to climb up and down relatively easily). How many years did it take you (and how long did you practice on average each week) to get to this level?
-
Magix pro audio division, including Samplitude and Sequoia, was recently sold to an American investor - and I'm anything but happy about it ---------------------------------------------------------------------------------------------------------------------------------------------------------------------------------------------------------------------------------------------------- Based on my current knowledge of the approach taken by the new investor behind the former Magix DAWs Samplitude Music Studio (the semi-professional entry-level version of the DAW), Samlitude Pro X and Samplitude Pro X Suite (the professional DAW versions) and Sequoia (the professional DAW version with advanced broadcasting features), I wanted to advise against using these DAWs for the time being (unless you can still get an older version such as Samplitude Pro X8 Suite). This is because Magix has sold its gifted pro audio section to the American video and audio editing developer Boris FX, which I was not familiar with until these days, and I will probably stick with my good old DAW version Samplitude Pro X4 Suite for the time being. But take a look for yourself: https://borisfx.com/products/samplitude/ While the familiar DAWs are certainly not going to undergo any major changes, a few not entirely irrelevant things have already come to my attention, giving me the well-founded impression that the American investor is threatening to rip new customers off and downgrade or slim down the product. Here are a few examples: 1) The really good Independence Pro sampler, with its approximately 70 GB of high-quality VSTi sample content, plugins, and sound design tools, has been completely eliminated from the expanded Samplitude Pro X Suite - allegedly for licensing reasons associated with the takeover. Strangely enough, the Independence Pro sampler still seems to be included in the really expensive Sequoia, according to the total installation size of approx. 90 GB. https://borisfx.com/products/sequoia/ Since Independence was one of the core features of Samplitude Pro X Suite, which allowed you to do a lot in terms of composition and sound design, this is all the more sad. Those who already had the Independence Pro sampler in earlier versions of the DAW will still be able to use it in future upgrades. But for all new customers, this would be a real disadvantage. You would then have to purchase Independence Pro Premium Suite for around 300 euros on top of that in order to get the full range of features you were used to from previous versions of Samplitude Pro Suite: https://producerplanet.com/de/article/independence-pro-premium-suite-3121/ … 2) Problems may arise with some of the collected VST instruments that are exclusively owned by Magix and whose licensing rights are therefore not held by the new investor. This could lead to problems, especially with older music projects that use some of the affected Magix VSTis, at least as soon as you upgrade to a current version of Samplitude or Sequoia. ... 3) In this context, it is also not yet entirely clear how the old DAW licenses and a possible reactivation (for example, after installing a new operating system) will be handled, as these licenses were always managed by the parent company Magix. As a precaution, I am expecting the worst in the long term, but I am still hoping for the best. … 4) The new advertising intro for the DAW with AI language tools worries me a little in terms of the usual professionalism of the product. Presumably, one of the reasons for this is to save on personnel costs for voice actors and translators in typical American fashion, thereby maximizing profits. But when these AI voices, which already sound inhuman and incredibly stupid, can't even pronounce the DAW's product name correctly, and apparently no one even noticed this during testing, I can't help but wonder how future versions of the DAW will perform and what the once-excellent support for queries and bug fixes will look like. ... I will definitely keep you up to date as soon as there are any new developments regarding the DAW in the wake of the new investor - maybe I'm just being too pessimistic and should give the new company some time and space to restructure. Nevertheless, it will probably remain a mystery to me how an innovative, passionate DAW developer like Magix could come up with the unforgivable idea of selling off its legendary pro audio DAW series to an American investor (I would have had far fewer concerns, and even some hope for progress, if it had been a forward-thinking Japanese company in this field)... ... while the parent company Magix stubbornly clings to its immature, crash-prone toy DAW Magix Music Maker. As I recall, I once wrote to the company to the effect that they should completely scrap this buggy product (if only for marketing reasons) and instead promote the well-functioning and stable semi-professional Samplitude Music Studio as the new entry-level product into the DAW world of Magix (because Music Maker is basically the ultimate anti-advertisement for the company, which at the time almost dissuaded me from upgrading to Magix's professional product line, which, in stark contrast to Music Maker, offers some of the best DAWs on the global market). But if I remember correctly, the company really wanted to convince me that Samplitude Music Studio was too complex for many beginners and that Music Maker was very popular. Does Samplitude Music Studio seem overly complex to you? https://borisfx.com/products/music-studio/ I find it really hard to believe that, with such excellent products in Magix's pro audio division, the company's management consists of complete idiots who have no idea about the product or things like sales. To me, it feels more like this takeover had been planned for a long time without many people knowing about it. Sometimes a large sum of money simply flows behind the scenes, one hand washes the other, and suddenly a high-quality product that far-sighted developers and passionate people have worked on for many decades, or maybe even half the company, changes hands (or even continents) to the highest bidder. It wouldn't be the first time something like this has happened, and money might rule the world even in such matters (once again to the detriment of true progress and higher human ambitions). … Perhaps music, composition, mixing, mastering, and sound design need to be used much more like a powerful form of magic that fills people with such pleasure, lively intensity, and an engrossing otherworldly attitude to life when they listen to it that greed, selfishness, opportunism, and thoughts of status and luxury seem like tiny, completely insignificant things in comparison.
-
I assume you mean the subtle ringing of the piano. But I think that's just part of the piano sound, or rather the effects (reverb, delay, or chorus) used for this piano preset (if possible, try playing this piano VSTi without effects, then add individual effects one by one until you find the one that bothers you). I've checked your audio sample with my studio monitor speakers (Yamaha MSP 3) and with my studio headphones (Beyerdynamic DT 880 Pro), and I could barely hear the ringing in the sample. I also loaded the audio sample into my DAW and checked for possible clipping artifacts. But even there, at least as far as the output is concerned, no distortion due to overdrive was detectable. However, you might want to check the input value again or try reducing the input volume. Otherwise, I wouldn't let laptop speakers or smartphone speakers deter me in this regard. Integrated laptop speakers in particular tend to massively overemphasize the high frequencies in the sound, which, in combination with reverb and delay effects, can produce a really unpleasant, jingling sound. I think I experienced something similar back then when I listened to the piano intro of my Crisis Core remix on my mother's laptop speakers. It might be a completely different type of piano - but maybe just compare it to your piano sound on your laptop: https://www.youtube.com/watch?v=mjndFXyi2us ... Based on my hearing and the audio playback devices I use, your piano sounds really good. ))
-
Just found some fresh 'n' fiery Lufia 2 remixes
Master Mi replied to Master Mi's topic in General Discussion
@MystWalker I just read your newbie introduction a few days ago. Man, this sounded quite sad. Did you grow up in a highly abusive environment or surrounded by nuclear physicists and rocket scientists or something? Because I find it hard to believe that a child would describe itself as a “dumb kid” without a correspondingly hostile human environment. If there is such a thing as dumb kids, then they are usually the ones who, as adults, drink away their most basic brain functions, consume harmful drugs, march into the resource wars of high society with the utmost euphoria, madness, and ignorance, or in other small-minded ways throw away the gift of life far too hastily. Sure, intelligent people can also develop suicidal, life-threatening tendencies when their life force is at a critically low level (or let's say, when bioelectric current no longer flows properly through their bodies). But in most cases, it is rather highly intelligent, creative, and passionate people who start doing interesting things like composing soundtracks and then develop such awesome musical abilities that they can create fiery Lufia 2 remixes like these. I had read about this imposter syndrome some time ago. But I always found it hard to imagine that such a thing even existed (since people tend to be happy about their own successes and progress and show off a little ^^), which is why I dismissed it as something belonging to the realm of unicorns, elves, and fairy tales. But you, with your exaggerated modesty in stark contrast to your insane compositional skills, really seem to be such a case. So I'm really glad I literally coerced you into finally joining OC Remix. :D ... Haha, man, that really made me laugh a little, especially when I think about how I pictorally stumbled into OC Remix with full force back then. I guess you could compare it to a radically overexited Golden Retriever turning a professional competition into a feeding frenzy: ... No kidding, man. I joined OC Remix around 2013, had just bought my first DAW, and was full of anticipation and euphoria back then. Even without any significant knowledge of music theory, composition, or mixing, I wanted to make a big splash and create my first remix to share here on OC Remix. The result was an accelerated, hyper-compressed remix loop of the original Battle #3 theme (the Sinistral battle theme) from Lufia 2, which also had massive (clearly audible) clipping in the master. At the time, I was very proud of my first remix and celebrated it enthusiastically (in a certain way, I still find it interesting today) - but of course, this kind of mastering disaster without any compositional effort on my part was completely torn apart by the old-timers at OC Remix (which, however, did not stop me from continuing to radically admire my first sound achievement :DD). I even kept my first shot in the dark 'n' dusty corners of my computer. Here, in case you want to listen to this track I called "Sinistral Salvation" (but be careful that the studio monitor speakers don't experience their own salvation and start to smoke 'n' burn out 'cause of the massive compression and clipping): Lufia 2 - Sinistral Salvation (Master Mi Remix - Short Version).mp3 (For some reason, this audio sample just seems to work if you are logged in.) Over the next few years, I slowly began to focus more and more on music theory, arrangements with my first own compositional ideas, as well as mixing and mastering. And then, after getting to grips with my first professional DAW and some more usable audio equipment, I was able to create my first real remixes a few years later, which, in the case of my old Lufia remix, already sounded something like this (again, a remix of the Battle #3 theme from Lufia 2). You have to turn it up about twice as loud to achieve a comparable loudness, because at this time I have already mastered all my soundtracks uniformly according to the EBU R 128 loudness standard with approx. - 23 dBFS as a target loudness value, in order to ensure a correspondingly high dynamic range and sound quality free from the degrading influence of limiters and compressors on the samples, peaks and transients: The remix already contains some really good compositional ideas, although the mixing/mastering is still kinda messed up here, as my mixing and mastering skills only began to develop about three years later, after I finally got myself some proper professional studio monitors and was able to hear certain things, details and inconsistencies in the mix much better and, based on that, gradually developed my dynamic mixing concept called “Life Force,” which was only really applied for the first time in my last two remixes. I will definitely give this Lufia remix a major update in the future with drastically improved mixing/mastering and certainly some interesting compositional changes. ... But by the time I, as a truly lame composer duck, have finished this, you will probably have released five new and truly overwhelming Lufia 2 remixes, which I will listen to on repeat with greatest enthusiasm. ^_^ -
Come on, guys - don't leave me hanging here. I really need some feedback on the latest version of my remix, especially from the old-timers and pros here, as I'm considering submitting this remix as my very first soundtrack at OC Remix. But I would basically be happy to receive a massive shitload of different opinions from a few OC Remix members. ))

