
timaeus222 Members
-
Posts
6,166 -
Joined
-
Last visited
-
Days Won
53
Content Type
Profiles
Forums
8Tracks
Articles
Events
Blogs
Everything posted by timaeus222
-

Timaeus's Technical Tutorials (Videos)
timaeus222 replied to timaeus222's topic in Music Composition & Production
To be honest, I found Zebra to be easier to use than Serum; I think Zebra prepared me for Serum, since Serum gives you almost everything at once, but Zebra shows you only what you bring up (when you add more oscillators, or envelopes, their UIs are dynamically added in). There are a bunch of tutorials on youtube for it; zircon gives you a great overview on its main features: https://www.youtube.com/watch?v=NxyoA7WvF7c There is also an entire playlist of "Mini-Tutorials" by Urs Heckmann: https://www.youtube.com/watch?v=NmdEREBtTH0&list=PL7AFE9859406139AA The grid is a way to lay out the oscillator connections in serial or in parallel. Serial just means it's connected in the given order, and parallel means you'll hear both oscillators at once. It's basically a way to layer sounds (if in parallel), or process them like you would in a typical column signal chain in a DAW mixer track (if in serial). Zebra is more for diverse sound design (like this), whereas I've found Serum to be most useful for bass design. -
In our day and age, we have access to some pretty hefty storage. I mean, look at this 128 GB flash drive for $5.59 (sure looks bleh, but man, that's almost as much storage as one of my external HDD's!) . I don't know how much that price got you in thumbdrive storage size in the times before I was born, but definitely much less than that! (Silly me, I still use an 8 GB thumbdrive for school.) I really don't think storage is an issue, so sure, the particular MP3 for the example I showed you (1:33 long) was 2.48 MB at 224 kbps and 1.42 MB at 128 kbps, but the main benefit is that a 192+ kbps bitrate minimizes compression artifacts across most genres of music (whether it has a lot of crisp synthesized elements or poorly-recorded mono distorted electric guitar), and keeps a consistent bar of quality when it comes to the "age" of ReMix submissions. I think it's a good thing that we at OCR favor higher bitrates over lower bitrates.
-
Timaeus's Technical Tutorials (Videos)
timaeus222 replied to timaeus222's topic in Music Composition & Production
I added a few more videos in the OP. -
OCR03366 - Super Mario 64 "Ripples of Hope"
timaeus222 replied to Liontamer's topic in ReMix Reviews & Comments
I remember when Kristina showed this to me 5 months ago. I love the slow deliberate pace this has, and the bells give this a nice serene atmosphere. Classic Chimpa groove meets Emu ambience! -
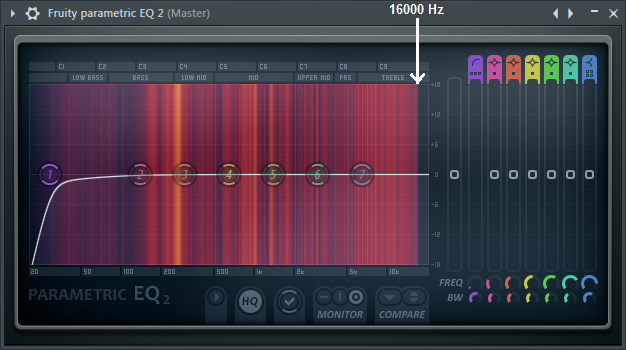
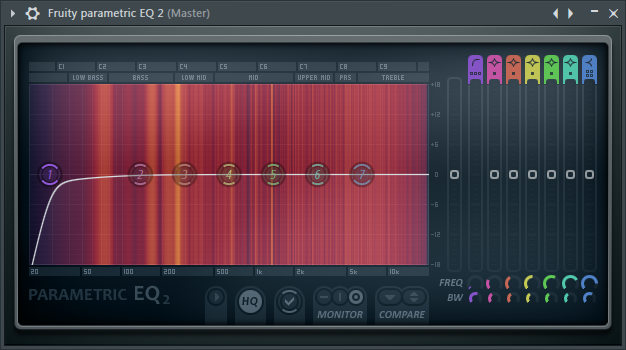
First of all, frame rate only applies to videos. YouTube videos currently peak at 60 fps for HD and 30 fps for SD. Second, people can hear differences between 128 kbps and 192+ kbps bit rates. Well, I can anyway, and I expect some of the younger people on the Judges Panel to be able to as well. A 128 kbps MP3 degrades audio above 16000 Hz, whereas I can hear pretty much all the way up to 20000 Hz. 128 kbps constant bit rate: 224 kbps constant bit rate: The difference is not obvious, but I hear it, and I can definitely see it. It's not the same as simply hard-low passing (high dB/octave slope) at 16000 Hz, but I do hear a slight degrading of the upper treble frequencies as a result of compression artifacts in 128 kbps relative to 192+ kbps.
-
The Legend of Zelda: Breath of the Wild
timaeus222 replied to DarkeSword's topic in General Discussion
For some reason, part of me kept reading it as "Breath of the Wind". -
OCR03369 - Street Fighter II "The Path of Heaven"
timaeus222 replied to Liontamer's topic in ReMix Reviews & Comments
I remember when Nabeel showed this to me last month for some last minute input, which I believe was temporarily faded out near the 3-minute mark. Now that it's complete, I would say that it was a smooth integration of motifs, an engaging arrangement, and was a good balance of repetition for the sake of saving time and repetition for the sake of familiarity. I'm usually impressed by Nabeel's workflow speed, and this is no exception. -
OverClocked ReMix Design ?'s and Issues
timaeus222 replied to Liontamer's topic in Site Issues & Feedback
I also see the same thing, on Chrome 51.0 and Firefox 42.0 (Windows 7).
-
ISW Reforged: worth it for the WAVs?
timaeus222 replied to Necrox's topic in Music Composition & Production
If you wish to try out some of the library, there is a free sampler version for you to check out (or at least I could've sworn there was). This was the one that I saw before the new ISW website update: https://dl.dropboxusercontent.com/u/59338379/ReForged Sampler.zip -
Golden Sun - Desert Theme // "Heatstroke and Whirlwinds"
timaeus222 replied to 2r1t's topic in Post Your Game ReMixes!
"Sub" and "sub content" just mean sub bass. Somewhere around 20~60 Hz is generally what most people define as sub bass. Right now, your kick has more sub bass than a hardcore hip hop kick [inside joke]! I agree that the snare is too treble-focused, without much low-midrange body (~200 Hz), making it sound "splashy and thin". The lead at 0:30 is OK, but a little grating. I'm honestly not sure what this genre is supposed to be, as your instrument palette is confusing to me. Something middle-eastern I guess, but that's a bit vague of a descriptor because I could say that simply by listening to the melody. The drumwriting is kind of all over the place, as if it was written just to have energy; it doesn't seem to complement the non-drums. The calmer sections with the harp and strings do work better, but the notes are very rigid/stuck to the grid (EX: 1:21 - 1:24, etc), and so they sound robotic. All human beings play instruments with a little bit of "mistakes" in their timing; even a few milliseconds' worth late/early is reasonable. At 1:56, and elsewhere, there is some clipping/crackling; the instruments are pushing above 0 dB (decibels)---meaning that they're collectively becoming too loud. So, you should be using a limiter, or turning down your bass frequencies on whatever's playing bass there (and elsewhere), since it's the bass that's mostly doing it in this case. -
Well, while FL isn't the best DAW in terms of what stock sounds are provided, I've been using it for the past 5 years and I've never wanted to switch. I think if you proceed to check out zircon's FL Studio tutorials, you'd learn a lot.
-
"The Heroic Journey", a new orchestral piece by me.
timaeus222 replied to YoungProdigy's topic in Post Your Original Music!
For what it's worth, even Miroslav Philharmonik 2 sounds pretty good. Plus, you should be familiar with its interface already. -
Maybe because you used the british spelling?
-
Need ears for 8 Bit / Punk project (drums)
timaeus222 replied to Wadokoha's topic in Post Your Original Music!
At this point, the snare on track 1 is still the most refined IMO; - In track 2, the snare is a bit too boosted near 240 Hz in comparison to track 1. - In track 3, the snare is a little more reverberated in comparison to track 1, but slightly less overboosted near 240 Hz compared to track 2. -
"The Heroic Journey", a new orchestral piece by me.
timaeus222 replied to YoungProdigy's topic in Post Your Original Music!
Well, I just had a lot of practice, and I try to listen attentively to the changes I make in my reverb, even if I had to exaggerate some edits along the way to hear them. You may want to try the ArtsAcoustic Reverb demo to have a flexible reverb that should help you learn more via the visuals. ----- FL Studio comes with four sends by default on the far right (they're labeled mixer tracks 100-103). Instead of putting reverb on the Master track, I put reverb designed for specific types of instruments on each send (such as drums [except kick], strings, brass, woodwinds, etc). Sometimes you could even separate them based on their reverb response if that helps (bassy, midrange-based, trebly, etc). Since each type of instrument is not expected to reverberate the same way in the same room (the walls of the room reflect certain frequencies differently than others), you now have the flexibility of accounting for that. Typically, you don't really want to have a low low-cut frequency for bass instruments, for instance, because it would then leave in the wet mix that is, say, below 200 Hz. That adds some mud to the mix, since it can add reverb to a bass, making it a little more "boomy". Similarly, depending on the situation, you may not want to add trebly "hiss" to certain instruments that you want to be distant (to feel muffled/dull), in which case you should then not have a very high high-cut frequency (the higher it is, the more "hissy" the treble reflections become, since the higher frequencies in the wet mix are still present). Blending notes basically means changing the way the room's walls reflect overlapping frequencies so that the instruments sound like they're in the same room. Some reverb plugins (such as ArtsAcoustic Reverb) allow you to adjust the amount of low, midrange, and treble Damping ratios, which aids in that respect. -
7th Saga, Overworld Theme 2 Orchestral Remix
timaeus222 replied to Slimy's topic in Post Your Game ReMixes!
New instruments. No specific problem parts, just something in general you could try. Maybe around the second half of the remix? You did have some shakers going on. So for example, you might add more auxiliary percussion (like tambourines, fingerbells, shakers, sleigh bells, etc) with a long-decay, high high-cut reverb. -
"The Heroic Journey", a new orchestral piece by me.
timaeus222 replied to YoungProdigy's topic in Post Your Original Music!
Since the section patches are pre-blended, and the solo patches aren't, ultimately, layering those (assuming the section patches sound thick) would make it still sound like a solo instrument atop a section. If that's what you're going for, that's what you'd get, approximately. If you just want a thicker section, layer section patches, like french horn + trumpet or french horn + tuba, depending on whether you want a thicker midrange or thicker low end (respectively). -
7th Saga, Overworld Theme 2 Orchestral Remix
timaeus222 replied to Slimy's topic in Post Your Game ReMixes!
Hey, this sounds pretty great! I like the atmospheric/underwater feel. I would say to check the bass mixing at 0:12 - 1:25. It sounds a bit muddy. Maybe try raising the low cut on the reverb for the more bassy instruments. I'm finding your bass to kinda blend in a little too well. I like the low dynamics at 1:54 - 2:12. Goes to show that atmospheric music can have dynamics. The background plucked instrument at 2:15 - 2:48 that repeats the same arp pattern feels a little weird in the soundscape. I think the spatial position is good, but it feels a little "cheap"/tinny in comparison to the rest of the soundscape, IMO. Maybe replace it with something with more body or round robins? Other than that, I would suggest maybe playing around with more upper-treble ambiences to contrast the low-midrange/midrange-heavy warmth in most of the remix. -
"The Heroic Journey", a new orchestral piece by me.
timaeus222 replied to YoungProdigy's topic in Post Your Original Music!
Uh... http://cgi.ikmultimedia.com/ikforum/viewtopic.php?t=11043 Unless I'm looking at the wrong Miroslav library, or if you simply didn't get the full version, it looks like there are some velocity layers. It's not the same sample at different velocities. ----- You say it as if you can't adjust FL reverb presets, when you can. Did you try adjusting the low cut and high cut to blend the low and high sections more? Did you try increasing the room size? Did you try lowering the crossover frequency so that it's not at 500 Hz? Did you try adjusting the Damping? I do think the French Horn sounds like an ensemble, but it's not very thick, which would indicate that you didn't layer slightly different timbres together. It doesn't matter how large the sample size is; if you didn't take the effort to thicken up the sound yourself via simple layering, you can't make the excuse that the library developer didn't do it for you. -
Need ears for 8 Bit / Punk project (drums)
timaeus222 replied to Wadokoha's topic in Post Your Original Music!
At this point, I'm a fan of the snare + toms on Drums1 and the kick on Drums2. The hi hats are pretty similar across the board, so any version of them work. In comparison, in Drums2, the snare tuning just seems odd to me in the first few seconds where the snare is hitting multiple times quickly, while in Drums3, it's something with the reverb low end that makes the snare feel a little distant. -
Very interesting take here. I liked the way the acoustic guitar was used to emulate the sci-fi effects in the original. Not much personalization in terms of the actual melody notes, but pretty sweet cover either way.
-
FL Studio 101 - 90+ Minute Video Course
timaeus222 replied to zircon's topic in Music Composition & Production
Pitch bending in FL using the standard pitch knob might be fairly unnatural-sounding depending on the plugin (sometimes it feels "stepladder"), but if you want to do it that way, there should be a "2" by default next to the pitch knob (it says "RANGE" right under the "2"). Then just increase that "2" to a "12" to allow a larger pitch bend range and thus one that is more noticeable. If you mean in the piano roll, it's portamento, and it only works for native plugins like 3xOsc and plugins made for FL's piano roll. You can go into the VST wrapper, click the wrench icon, and enable "Mono". That should allow you to "bend" from one pitch to the next (portamento) in the piano roll for native plugins. Or, you could double click one of two overlapping notes in the piano roll for a native plugin and enable "Slide" (the right triangle) to slide from one note to another. -
Need ears for 8 Bit / Punk project (drums)
timaeus222 replied to Wadokoha's topic in Post Your Original Music!
Well, like I said, it could just be because it was fairly quiet both times, and I don't entirely remember how it sounded previously. So it's not just you! Everyone's been there; you're just working your way up! By the way, on the A/B comparison I posted, I was actually turning the EQ+compression on and off. When it's off, the sound is how it was after simply bumping up the volume. When it's on, there is less treble in the hi hats near 15000 Hz, and the sound is a little tighter. I was hoping that would help you with EQing the uppermost treble, and with compression for cohesion. ----- If you render a quiet track and then turn up your speaker volume (scenario A), it's not the same as moving the volume sliders up inside your DAW (digital audio workstation) with or without limiters (scenario B), even if you are listening at the same output volume. The difference is this: - Scenario A gives you a music file that is quiet on an absolute scale (usually indicated in dB). That means if someone listens to the song on your computer and turns up the volume, sure, it would be loud, but for someone whose speakers are calibrated for louder music, it will sound quieter in comparison. - Scenario B gives you a music file that is closer to the common loudness standard: close to 0 dB, but with an applied limiter so that there is no added distortion to the song in the form of crackling, known as clipping. Sure, now you would have to make sure you don't make things too loud, but this way, people don't have to turn up the volume just for your song, and then down again for their other, louder music. Another way to understand this is by the waveform of the song. That's the loudness plotted against the time passed. - Scenario A gave you something approximately like this for your Drum Test 1: - Scenario B would give you something more like this (which is what I ended up with): In Scenario B, I think it's easier to see any unevenness in the loudness of each section in a song. Maybe you can notice that when the kick and toms layer, they are louder than the toms or kick by themselves (which is natural for the constructive overlap of sound waves). Also, scenario B is what I've been seeing, at least in the time I've been writing music.

-
Trippy! The drum breaks made the weird time sig even more disorienting (in a good way?). I think that keeps the listener guessing (and well, listening!). Maybe the leads could have been louder. Other than that, pretty solid work!
-
Need ears for 8 Bit / Punk project (drums)
timaeus222 replied to Wadokoha's topic in Post Your Original Music!
I'm not sure I hear much difference. Maybe it's just because it's fairly quiet overall (I'm finding that it's by about 6~8 dB). For example, this is the loudness I was expecting: https://soundcloud.com/overclocked-records/timaeus222-mmbn-legacy-resonant-transmissions-01-theme-of-mega-man-battle-network-legacy After bumping up the volume, you should be able to hear the changes you make more clearly. By the way, you should also generally mix in context---if you had soloed a sound and adjusted it, then un-soloed it, you won't hear the difference as clearly after hearing it in context. I think the hi hats sounded cleaner. When I look more closely, when the toms layer with the kick, they become collectively louder than the snare. That's a natural thing, but would become an issue if/when you use a limiter, as the limiter would generally push down harder on louder peaks. As an experiment, I bumped up the overall loudness, and A/B compared with EQ and compression, vs. without (note that the EQ affected everything though, including the snare). https://dl.dropboxusercontent.com/u/59338379/8bitpunk_before_after_comp.wav


